...the things in life that bring just this...


Thursday, February 9, 2012

farm table from pallets

we have had the table below outside, in our backyard for about a year now. we bought it from a second hand store downtown with hopes that it would serve as sort of a psuedo farm table where we could have dinners with guests around sunset. this never happened because our backyard was never finished and was pretty much a giant dirt area (i will say that it is finished now and i have some pretty great before/after photos which i will share in my next post) and the table was big but not quite as big as i had hoped. so it became neglected outside and thus with our sun (and some rain) became damaged:


while we were in th midst of working on the yard, i decided to salvage the table and use it as a base for a proper farm table so i could make it longer to fit more chairs. so i asked jeremiah to see if we could take some pallets off the museum's hands.  here they are below in all their glory. and i have to admit that i thought it would be a lot easier to get them off, but the nails were rusty and more like screws.

so it took some time, a lot of muscle, and breaking quite a few of the wood pieces, but eventually it led to this...


once we got enough of them removed and placed on the table just so, jeremiah
screwed them all into the base table and i finished it with some semi-transparent weatherproofing stain that
i purchased at good old home depot. and voila! 


i have honestly always dreamed of having a table like this and the great thing was that the pallets were free! and there is nothing more rewarding than making things with your own hands!

if you feel like making one yourself and don't already have an old base table to use you can purchase legs for pretty cheap at places like home depot or ikea even and if you don't know anyone with some extra pallets lying around, craigslist is a great place to start. they are usually free or maybe around $5 a pallet, because companies have to pay to have them removed so you are actually doing them a favor...and with a little love, getting something beautifully handmade in return.

Tuesday, February 7, 2012

diy rug, any way you want it, on the cheap!

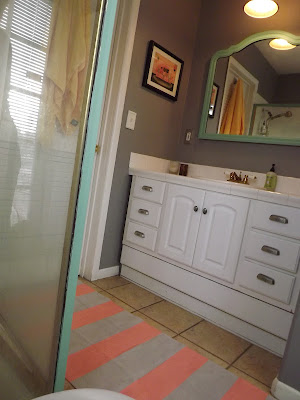
i have been needing a new rug for our second bathroom for a little while now. i recently repainted the walls, mirror, and shower, finally hung art on the wall, and bought new, brighter towels. it was a dull blue from the previous owners and it feels so refreshing to have some fun colors in there and slightly kitchy decor. the missing, final piece was the rug. i knew i wanted a coral or salmon colored rug with a pattern to tie everything together, but i also knew that when i have something specific in my head, it is usually the hardest thing to find (and i am also on a time crunch because that is the bathroom that leads to our backyard and the one that our guests will be using for the birthday party on sunday)...plus i don't have a ton of money to drop on a rug at the moment...sound familiar?

after checking a few websites and realizing that i wasn't going to find what i wanted it dawned on me to just make my own. so off to home depot we went! using a 5x5 painter's drop cloth, a sample jar of the perfect coral color, my sewing machine (to hem the edges of the rug after i cut it to the size i wanted),  tape, a roll of grippy shelf liner (that i got at the dollar store), and some tacky glue (which i always have on hand) i made exactly what i wanted...and the best part of all is that it only cost me $12 and took me about 30 minutes to complete!!

i decided to do stripes, taking advantage of the natural color
of the drop cloth so i started by measuring and taping the stripes (after
i had cut and hemmed it to the right size).

here they are completed!

when it was dry, i turned the rug over and glued the roll of liner
down the middle with my tacky glue. if you want to spend more you can get another roll to
cover the whole backside of the rug,
but i feel like one is sufficient enough to do the trick!

done and done! *

*now that i am finished i will probably spray some scotchguard over the surface for good measure just to protect the fabric from stains.

Monday, February 6, 2012

crawling is for the birds!!


our little in-flight model!

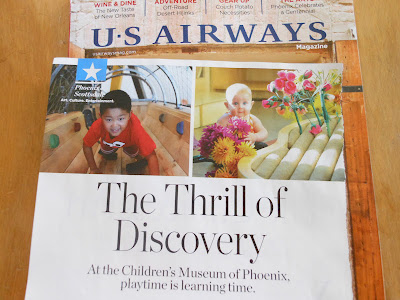
the children's museum of phoenix is featured in this month's u.s. airways in-flight magazine and clémence is one of the models in the ad! she was 6 months old when they had the photo shoot but how fun that she is international! so if you are flying this month check out our babe!!

Saturday, February 4, 2012

first birthday invitations

i am sorry for my lack of posts lately.  the birthday party is only one week away and i have been so busy making everything for it. since the invitations are well out by now, i wanted to share them on the blog.

i feel like invitations are a very important part of a party or event that sometimes get overlooked or are thought of as a minor detail, but to me they are the only window into what the party will be like for the person receiving it. they are the first impression if you will. so after looking and looking for ideas, i was so excited when i came across the confetti popper invitation here on one of the blogs i follow and love. it was fun and exciting, super clever, and a total surprise to the one receiving it...perfect for her first birthday! and i love taking an idea from someone and totally making it my own and i am so happy with how they turned out...

the blog gives you the free printable labels along with instructions
on how to disassemble the poppers, but since her party is
french themed, i thought it would be fun to have the french
translation on everything so we added that!

i hand made the confetti with a 3-hole punch so it would match
the cardstock of the invite, but added the glitter paper and
and sparkle embroidery floss to make it extra fun!

here is the flip side in french (and sorry about the white square but i
didn't really want my address on the internet)

and this picture is just to give you an idea of the process! since i could really only work on them during naptimes
and in the evening, these probably took me about a month to make! But soooo worth it to me!

Friday, January 27, 2012

miniature photoshoot...

i haven't done one of these in awhile and she has been making so many great faces lately!!


Tuesday, January 24, 2012

Another 'what's in the fridge' recipe: grilled eggplant and zucchini sandwich with asiago and garlic mayo

This turned out to be quite a surprisingly flavorful sandwich and is now one of our favs! It is pretty quick and simple...just how I like my recipes. Here's how you make it:

What you'll need..

1 eggplant sliced lengthwise
1 zucchini also sliced into strips lengthwise
1/3 C shredded asiago cheese
1-3 garlic cloves chopped depending on how much of a garlic lover you are
4 Tbs mayo
Any type of artisan bread you prefer (we made ours with a bread called como that we got at our local grocery but I think sourdough would be nice as well)
Olive oil

Directions:
Saute eggplant and zucchini in olive oil until lightly brown. Meanwhile, shred cheese and chop garlic. Mix garlic with mayo. Toast bread and add garlic mayo to both sides. Layer on cheese and the veggies!